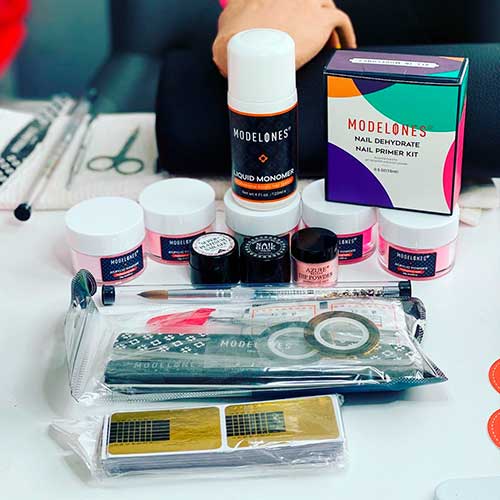
Indeed, using Acrylic Nails Tools for Beginners can help make it easier for you to get the look you want. So, in this post, we will help you to start a challenge in applying acrylic nails yourself. But, you need patience and time for practice, and you must have all the required supplies for this application.
In this post you will know the must-have supplies and tools to do acrylic nails at home, and how to use each product, to make it easy for you. Also, we will show you the optional tools and their alternatives, Let’s get started!

1. Cuticle Pusher Tool
Using a cuticle pusher is so easy, and its main purpose is to push back the cuticles in order to prepare your nail correctly. So, the acrylic or nail tip adheres properly that help your acrylic nails stay on and last for a long time.

2. Cuticle Nipper
Cuticle nipper and pusher tools are used together at the nail prep step. But, you start off with a cuticle pusher, but you the excess bits you can remove them with a cuticle nipper by placing its jaws on the excess bit properly and squeeze together. In addition, to get rid of these bits that would get in the way while applying for your fake nail extensions.

3. Nail Clipper
Use it to clip your nails down, also you can use it to cut the sides for different nail shapes. So, the big one is the best nail clipper because it can serve you both purposes.

4. Nail Tip Cutter
Use this tool to cut your fake tips to your favorite length, after you adhere them to your natural nail with good nail glue to ensure long-lasting acrylics.

5. Craft Scissors
Choose handy craft scissors to cut the sides and tips of your nails for creating different shapes such as tapered shapes, instead of nail sides filing, and save time.

6. Acrylic Powder
It’s the powder that is widely used on nail extensions. And also can be applied on natural nails to conceal broken or damaged nails. Also, some different types of acrylic powder are available in the market today. But, we recommend the pricey ones which, ensure the best acrylic nail quality and have more safe for your natural nails.

7. Acrylic Liquid Monomer
Acrylic powder (polymer) must be mixed with the acrylic liquid (monomer) to form and prepare the acrylic that will be applied over your nail extensions.

8. Dappen Dish
You can pour it, some little liquid monomer for an easy and quick application process. Now you can properly dip the brush on this Dappen dish instead of the big liquid monomer bottle.

9. Acrylic Nail Brush
You must have some different sizes of durable acrylic oval brushes from size 9 to 12, and brush size 9 can be the best one for you to account for as a beginner.

10. Acrylic Nail Dust Brush
This tool is used to remove dust from nail filing, and this process is necessary to get the best quality finish for your acrylics.

11. Acrylic Nail Primer
Indeed, it’s a very important product that ensures the best adhesion for the acrylic application to the nail-prepared nail extensions. So, you must clean the prepared nail extension properly before applying the acrylic nail primer.

12. Nail Tips (Clear & Natural)
You need to have nail tips (optional) that will be glued to your natural nails. Then, you can form it to the desired nail shape you prefer. Besides, having a clear or natural look is up to you.

13. Nail Glue (optional)
Different types of nail glue available in the market will help you apply the acrylics onto your nails firmly with the ability to be removed without problem left. Besides, even if you have an allergic reaction to nail glue, you will find some glue brands free of harmful chemicals. But, if you opt to apply acrylic on your natural nail then the nail glue is not needed.

14. Nail Files
Undoubtedly you need to file nail extensions to get the nail shape that you want and to prepare them for applying the acrylic. Also, there are different file types and the best one for acrylic nail extensions is the coarse one and its grit number (80 to 100). Where coarser files have lower grit numbers and smoother ones have higher grit numbers. But, buffing nails required ultra-fine files (600 to 2400) with grit numbers, so you should have different grit number files.

15. Nail Drill Machine & Nail Drill Bits (optional)
These tools are considered electric nail files that must-have for nail technicians to save time. But, I think it’s optional for personal home use. In addition, the nail drill machine needs different drill bits for different processes like nail shaping, cleaning, and nail buffing. So, you should choose the suitable nail drill bit for each process.

16. Lint Free Nail Wipes
Of course, these wipes can be helpful for cleaning tools and brushes, and for nail preparation before applying the nail primer. So, use these wipes to get rid of any residue during the acrylic nail process.

17. Acrylic Top Coat Nail Polish (optional)
There are gloss and matte nail polish top coats that, can pop your nails look with a gloss or matte finish it’s up to you. Besides, a gel top coat can work properly over acrylic nails.

18. Cuticle Oil
At last, cuticle oil such as (ORLY Argan Cuticle Oil) can make your nails tough and protect them against breakage. So, you should finish the acrylic process by adding a stroke of cuticle oil above the cuticle area for each nail. Then, rub it gently with your fingers.

